i-am.ws |
Brightness MacOS Ventura
My Mac Mini M1 from early 2023 came with MacOS Ventura 13.0. After connecting the HDMI to a monitor, the screen was very dark, hardly readable. However the Brightness control keys on the Apple "Magic Keyboard" (F1/F2) didn't work to adjust this.
So I opened System Settings -> Displays and noticed that the Brightness slider was absent. Browsing Apple-Communities I finally found a post from someone running 13.4 who had the same problem. After multiple calls with Apple Support a senior engineer finally told him that this was caused by a bug in Ventura on Mac M1's. And that there was no fix for it, that he had to wait for the next MacOS update.
After reading that, I upgraded my Mac Mini to "latest greatest" :) Ventura 13.6 and thought that that would solve my problems, but half an hour later still no Brightness slider. A further upgrade from Ventura to Sonoma is of course a possibility. Whether that will make the slider and function keys to reappear ... who knows?
Later I saw a post that mentioned that this bug relates to external displays. Therefore the Mac Mini issues. On a MacBook with Ventura, the built-in screen has brightness control, but an added external screen does not.
It's a shame that for seven MacOS updates Apple didn't fix this pretty evident problem !!
Posted at 02:28PM Feb 10, 2024 by WWWillem in Desktop |
Netpbm without Libraries
Last seven years I've been building a large web application that is doing a lot of image manipulation. When I say large, we're talking here about fifty thousand lines of code. To achieve that the only way is to script and automate all the image processing. Where my web front-end is in Perl, the back-end is 100% based on the Linux netpbm tools (get it here). And if netpbm is missing some functionality that I require, then I will typically develop a new netpbm tool and contribute it to the package (that's how pamwipeout and pamrubber came into being).
After thirty years the netpbm package is now pretty substantial in size. So for creating a tool that is small and rather custom it is often easier if you don't need to do the full netpbm install and build. But you will need your own code to read, analyze and write your PNM files. And of course in those cases I don't submit the results to sourceforge.
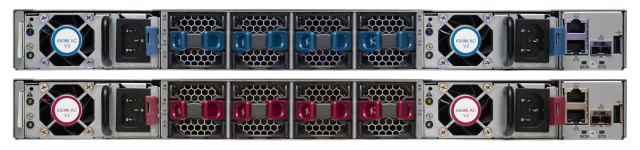
As an example, these two images one with blue fan parts (air intake in the datacenter cold aisle) and the other with red ones (fan exhaust in the hot aisle). Often I have only one of the two pictures and I need to convert it. At first I would use Gimp to manually convert from one to the other – or vice versa – but automating it makes the process much faster and less error prone.
The transformation here is a simple process of finding the blue pixels and then changing the hue (hue/saturation/value) to red. The procedure is to convert r/g/b to h/s/v, then shift the hue from blue to red and convert back to r/g/b. A not too complex operation and a nice opportunity to bring out my home grown netpbm code. When it is for only a custom single purpose you can typically simplify things a lot, like only doing 8-bit PPM and skipping PBM, PAM, etc. Plus skipping a lot or error validation. In this case resulting in just 500 lines of code, not too bad.
This program is only meant as an example framework and therefore named ppm2ppm. After extending it with your own functionality, you should of course rename it to something more meaningful like in this case maybe "ppmblue2red". Btw where the official netpbm tools are typically using "to" in their names (like pamtopng), I try not to do that in my home-grown NetPBM programs, using a "2" instead to distinguish things.
Posted at 12:55PM Dec 21, 2018 by WWWillem in Software |
UCS-M Capability Catalog
As a Cisco SE for UCS I've always been doing a lot of programming and scripting using the XML-API of the Fabric Interconnects. Sometimes simply with bash and curl, often doing Perl and at other times using PowerShell and PowerTool. One thing that always bugged me is the inconsistency of attributes like part id's, model names, etc. Especially in the early days of UCS there was little logic in that naming. However in later years things got better and more consistent.
As an example, if you query the "memoryUnit" class (which are the DIMMs in the server) it will return over thirty attributes – like size and speed – but none of them is the part number as on the Cisco price list. What comes closest is the Model field, but that is the part number as given to that part by the OEM, for example Samsung. Question then becomes quickly how to correlate that to the Cisco PID. Often I had in my scripts to resort to building tables that would translate one to the other, which is a lot of work and also requires constant updating.
We have to make a little side-step to discuss how to query the UCS API. Yes you can start digging in by building code, but there is a very handy tool that allows you to browse the UCS Domain Object Model interactively. Point your browser to "http://<ip-address>/visore.html" of your Fabric Interconnects. You will be asked to login. In the "Class or DN" field type for example "memoryUnit" (case sensitive) and it will show you all objects of that class, which means it will list all DIMMs in your system. The arrows behind the "dn" attribute allow you to move up to parent objects or down to list children objects. If you like to start at the top of the DOM, you can enter the class "topSystem" with the root object "sys" (this is the physical view like chassis and blades) or the class "orgOrg" with the object "org-root" (which is the logical view containing things like service profiles, policies, pools, etc.).

Now back to part id's and names. If you look into the Inventory tab of the UCS GUI, you see very clear names and descriptions, but you won't find those in the classes for those components. That gets stored in the "capabilies catalogue". But when you search the class "capabilityCatalogue" (which exists) you will find nothing useful. Instead search the class "equipmentManufacturingDef" (this query can take half a minute, so be patient) which will give clear attributes for over a thousand parts. And with PowerShell you can collect and store all that data into a table.
Get-UcsManagedObject -classid "equipmentManufacturingDef" |
                                   Export-Csv -NoType C:\Temp\ucs-catalogue.csv
Now search in your browser that Visore page for "UCS-MR-1X322RV-A" and you will find two occurrences from different memory vendors. You will also see the "oemPartName" which is what we found earlier as the "model" attribute in the memoryUnit class.
From there you can take it further as far as you want to. But now you have access to the proper description, sku, pid and similar fields.
Posted at 04:12PM Jun 04, 2018 by WWWillem in DataCenter |
PAM to PNG Converter
Five years ago I wrote on this blog (just scroll down) about a "Quick & Dirty" pam2png utility to add alpha channel handling to pnmtopng. Which is part of the NetPBM graphics toolset in Linux. The pnmtopng software had over a lifetime of twenty years seen so many revisions – by different people with different visions – that it was finally time for a full rewrite.
Over those years the code nearly doubled in size. With pamtopng I brought it back to a quarter of the current pnmtopng. Because today's computers are so much faster than twenty years ago and because memory is now plentiful, all kinds of very clever but complex optimizations to compress the PNG image could be removed. And if you need maximum compression, there is always pngcrush. At the same time 60% of the command-line switches were dropped.
More detailed information about pamtopng can be found on the man-page at SourceForge. Which is also the place to find the source code. Because of the NetPBM software release system, when it comes to Linux distro's pamtopng will not always be included. For example it is part of Fedora since version 23, but as of today you won't find it yet in CentOS.
Posted at 04:01PM Dec 30, 2016 by WWWillem in Software |
Tuning ffmpeg for MythTV
MythTV is my default way of watching television. It stores the content as MPEG2 files, the video with a bitrate of 6000 kb/sec and the audio with 384 kb/sec. For the purpose of watching the content outside of my home, I do post-processing to reduce the filesize such that it can be copied over the Internet. The tool of choice is of course 'ffmpeg' which has a large number of flags to control the output. I used -qmin, -qmax and -qscale to tune down the file size. For audio, the ffmeg help-page says that without flags the output will have the same quality as the input, which sounds good.
I started to dig deeper and discovered that what I was doing was far from optimal. On the video front the compression was so high that it resulted into those "quilt pattern" squares. Which I accepted as a fact of life, but while playing and testing, I found that I could get the same level of compression, but with a much better picture quality, by simply reducing the video bit-rate instead of using the qscale flag.
Then I discovered an even bigger issue with the audio. The default behavior (at least in my case) appears to be not to copy the audio bit-rate from the input file but to use 64 kb/sec, down from 384. And that results in big distortions, especially with music. I started experimenting and 128 kb/sec gives pretty acceptable audio, while the difference between 256 and the original 384 kb/sec can't be noticed with your average TV program.
So, here is how I am compressing now, which reduces the file size to a quarter of the original.
# ffmpeg -y -i file-in.mpg -vcodec msmpeg4 -b 1000k -ab 128k file-out.avi
Then I started to look at reducing the file size of those MPEG2's for archiving purposes. In this case quality decrease is of course not acceptable. I opted for MP4 as the format and got the following as a good compromise.
# ffmpeg -y -i file-in.mpg -vcodec mpeg4 -b 3000k -ab 256k file-out.mp4
I can't see the difference with the original and it shaves off around a third. Please notice that the video codec is 'msmpeg4' for avi files, while 'mpeg4' for mp4 files.
And now I will have to start recoding half a TB of video content :) ... that will keep my CPU busy for a while.
Posted at 03:25PM Sep 21, 2014 by WWWillem in Software |
VirtualBox P2V
Clearing out an old computer in the basement, I wanted to save the system on it. The box was running RedHat and a Content Management System "CMS Made Simple" that I had used to build some websites. Of course this asks for P2V, in other words copy the content of the disk in the server to a virtual image that can then be run on a hypervisor, in my case VirtualBox.
I thought that this would be a tough thing to do, but it ended up being pretty simple. To start, take out the disk, fit it in an external disk enclosure and contact that by USB to the system with VirtualBox. Use "fdisk -l" to find the device name. You don't care about the partitions on the drive, because you want to copy the whole thing.
Now copy the content of the disk to a file with a command like "dd if=/dev/sda of=~/RH-CMS.img". Next convert it to a VirtualBox compatible image with "cat ~/RH-CMS.img | VBoxManage convertfromraw stdin ~/.VirtualBox/HardDisks/RH-CMS.vdi 4327464960". The last number is the size of the image as given by "fdisk -l /dev/sda". Again it is not the size of the partition(s) but the size of the device.
If you (also) run VMware, convert this VDI file to a VMware VMDK format with "VBoxManage clonehd ~/RH-CMS.vdi ~/RH-CMS.vmdk --format VMDK".
Final step is to create the VM. Start VirtualBox, create a new VM and when it asks for "Virtual Hard Disk", click "Existing" and select the RH-CMS.vdi file you just created. And that's all there is to it. You can now increase your disk space, snapshot the image, create backups and your server can continue life without taking up a physical box in the basement.
Posted at 01:48PM Mar 15, 2014 by WWWillem in Virtual |
Mobile Navigation
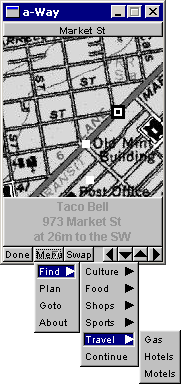
Going through some folders with software development projects from the past, I came across this one, which is dating back to the spring of 2003. One of those attempts to get rich quick :) with a startup. The idea was to have a small mobile device with GPS that would show you the map of where you were and then allow you to get directions to the closest coffee shop, gas station, hotel, etc. And then of course sell those ads commercially. Hey, this was still (the end of) the dot-com era. Sounds familiar? Yes, four years later Apple introduced the iPhone, so we're definitely talking here about "prior art".

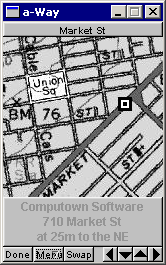
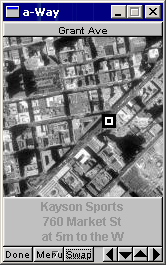
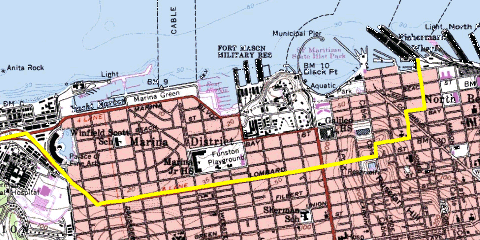
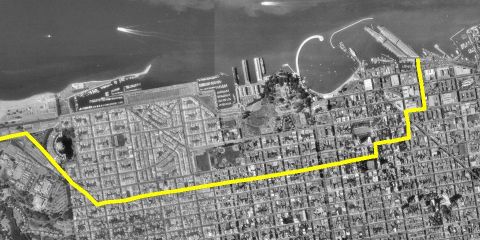
The app got as far as a functioning prototype with data for downtown San Francisco. You see it here searching for hotels, while walking along Market Street. It had maps and aerial photos from the Microsoft TerraServer. Which is an interesting piece of history, because Microsoft got the maps from the USGS, but bought the aerials from the Russians. Not surprising that it only contained photos from space of the USA. :-)
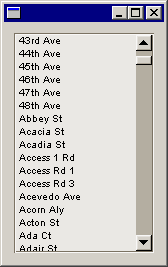
I got my location information about restaurants, shops, theaters, etc from an on-line Yellow Pages database. I also needed a vector based map, because otherwise you can't do proper path planning. Found that in a database from the US Census Bureau called Tiger. The shortest path calculation was of course based on Dijkstra's algorithm.
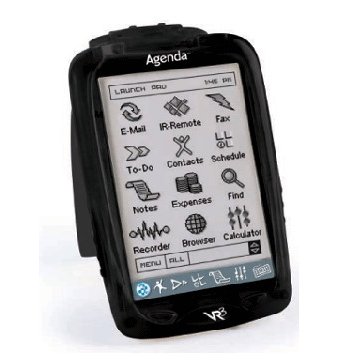
In 2003 the mobile devices of the time were PDAs. Remember those? One startup company called "Agenda" developed a model that was fully based on Linux. Through the serial port and using ppp, you could even telnet and ftp into the device. The GUI couldn't do X-Windows – not enough processing power – but someone created a port of FLTK for it. A nice thing was that you could compile the same code base for desktop Linux, Windows or the Agenda.
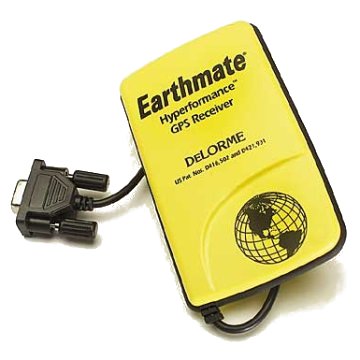
The GPS to use was an easy choice, always been a fan of DeLorme units. It connected to the PDA through a serial cable.
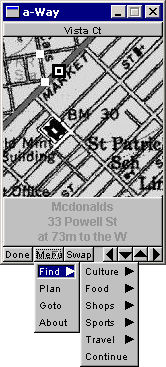
As you can see below, there were various categories to pick from. Or you could do a "Go To" by clicking somewhere on the map. The little white dots are the route to get to your destination. Or you could pick a street name from the Tiger database.
To be honest, by now I have no idea how this could have scaled to cover more than just a city. But it was lots of fun to develop. And it worked.
 |
 |
 |
Posted at 01:20PM Jan 19, 2014 by WWWillem in Software |
Rendering Cisco UCS
Last half year I've been working on a cool little project with a Calgary company called DIRTT. Which is a manufacturer of office interiors and for that purpose they developed a design and rendering tool called ICE. An addition to the suite is called "Mission Critical Systems" which allows the software to be used for Data Centers. And that's where it becomes interesting for myself.
One of their big customers is Panduit, the manufacturer of computer cabinets and other Data Center products. Many Cisco DC's are using Panduit products for racking of servers, storage and switches. Panduit is using ICE to design new infrastructures and uses the renderings of ICE to show the resulting plans to their customers.
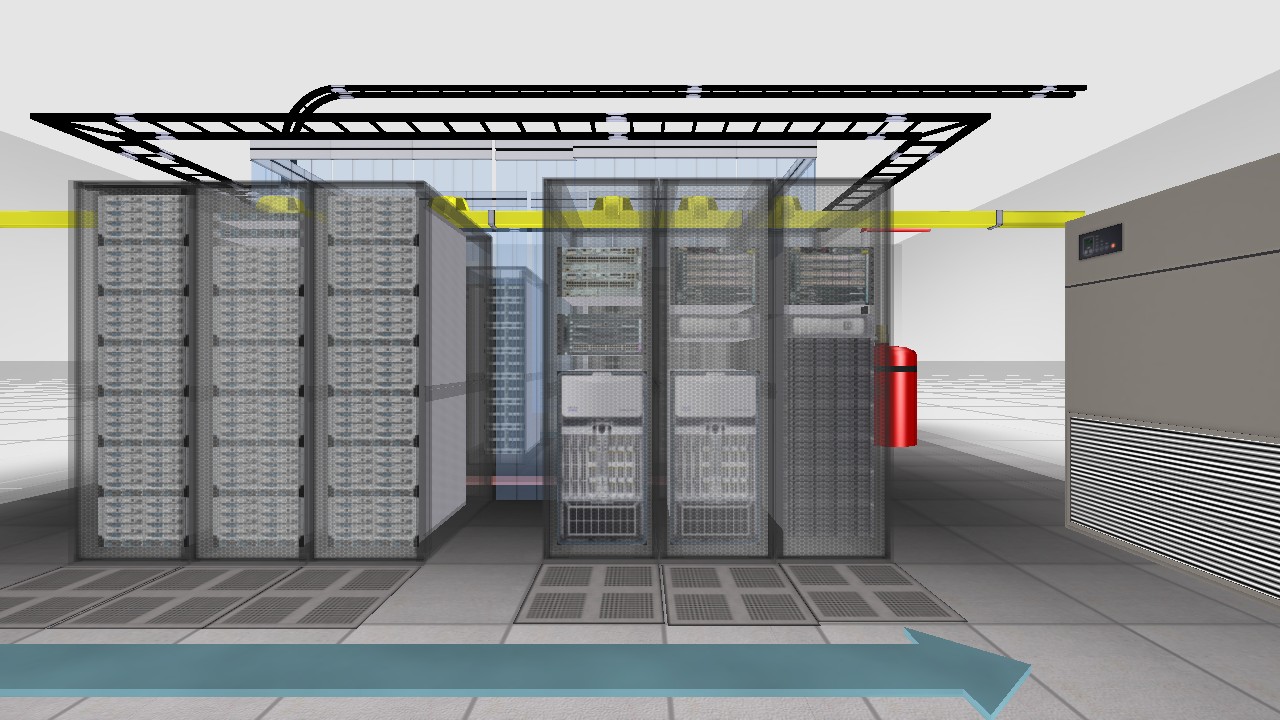
Within Cisco I developed a utility that allows our Systems Engineers to quickly model a Cisco UCS system. It is a web based utility that only requires clicking a bunch of radio-buttons to enter the configuration. It generates the layout images mainly using a chain of NetPBM tools.
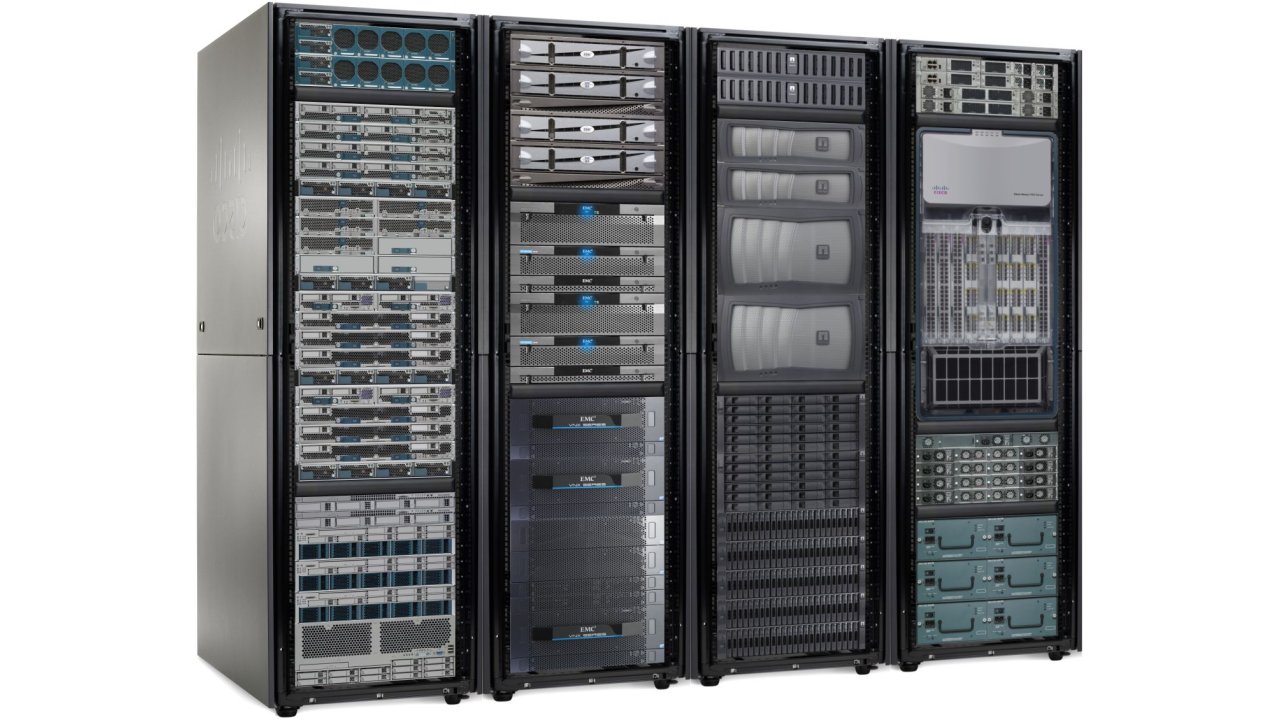
To create my UCS layout tool, I collected a large amount of product images. Therefore, helping IceEdge to create a library of building blocks that takes care of putting servers and switches in those cabinets and racks wasn't too much work. And probably it won't surprise that this is all scripted, again using NetPBM.
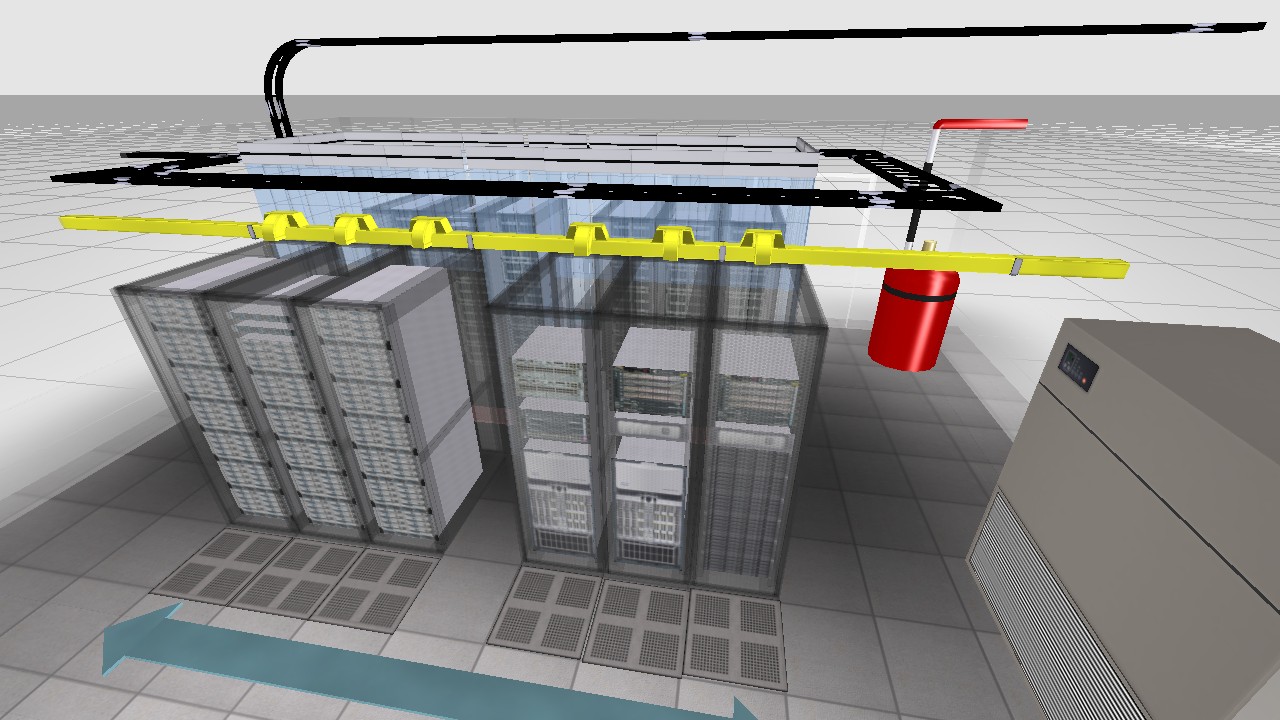
The result is really, really cool. ICE allows you to build a model like the one below in not more than an hour. And that was without having any previous experience with the software. This example shows customized racks, hot isle containment curtains, cable and fiber trays, a complete raised floor including perforated tiles, then cooling and fire-suppression equipment and finally all enclosed by walls that are kept semi-transparent to maintain a good view on the inside.
This was a cool little project. Contact the folks at IceEdge if you want a demo or when you need software licenses.
Posted at 05:11PM Jul 21, 2012 by WWWillem in DataCenter |
Alpha for PNG with NetPBM
As a co-developer of pnmtopng / pngtopnm it's already a long time my plan to update those two NetPBM programs for the PAM format, allowing for proper alpha channel support. On sourceforge you can find a pngtopam program — not sure how full featured it is — but there is currently no pamtopng, which is IMHO the more important of the two.
Two weeks ago I was myself in desperate need for a PAM to PNG converter, and I didn't have the time to do some proper development, therefore decided to do a quick & dirty one. Luckily I wrote 10+ years ago two PngMinus tools, which was targeting the same type of converters, but without the need for the NetPBM libraries.
Long story short, I wrote a "pam2png" utility, which is not as feature rich as a pamtopng program would be, but it does the job. Its main purpose is to convert 4-channel "RGB_ALPHA" pam images to png, but it does the conversion of 2-channel "GRAY_ALPHA" as well. However, the latter wasn't extensively tested.
To be honest, I stopped testing and debugging when the program was good enough for the images I needed to convert to PNG. And I will not spend too much more time on it, because the real goal is a proper pamtopng implementation. But if you find bugs, send me the fixes and I will incorporate them. Don't waste your time on adding functionality, because this is just a temporary job.
Finally, if you don't know how to create those PAM images with R+G+B+A channels, check out the pamstack command. This tool allows you to combine a regular RGB ppm image with an alpha channel image packaged in a pgm file. The README file in the tar-ball shows how to do it.
Posted at 12:33AM Dec 18, 2011 by WWWillem in Software |
jQuery Mobile on Android
I developed an app for BlackBerry PlayBook that is using the jQuery Mobile toolkit to create the user interface. Now jQM is a portable framework that can run on many platforms, ranging from your regular Chrome, FireFox or Safari browser, to mobile devices like iPhone or Android.
Searching for how to deploy jQuery Mobile on Android, most examples are written as a WebApp. The code is loaded on a web-server and you point your Android browser to it to start the app. But what I wanted was everything packaged in an .apk file that can be installed from the Android AppMarket. To achieve this, you have to create a small Java wrapper around your html and JavaScript code. In this tutorial I will be using Eclipse on CentOS as my development platform.
- First step is to create in Eclipse a new project: "File > New > Android Project" and give it a name (let's say "IceCream", I copied the jQM code from a blog by Matt Doyle), select the target and enter the package name, like "ws.iam.icecream". Keep Create Activity checked.
- Next we'll be adding a WebKit WebView to onCreate():
    package ws.iam.icecream;

    import android.app.Activity;
    import android.os.Bundle;
    import android.view.Window;
    import android.webkit.WebSettings;
    import android.webkit.WebView;
    import android.webkit.WebViewClient;

    public class IceCreamActivity extends Activity {

        @Override
        public void onCreate(Bundle savedInstanceState) {

            super.onCreate(savedInstanceState);
            this.requestWindowFeature(Window.FEATURE_NO_TITLE);
            setContentView(R.layout.main);

            WebView webView = (WebView) findViewById(R.id.webview);
            WebSettings webSettings = webView.getSettings();
            webSettings.setJavaScriptEnabled(true);
            webView.setWebViewClient(new WebViewClient());
            webView.loadUrl("file:///android_asset/index.html");

            return;
        }
    }
- And if you want to use HTML5 LocalStorage, you should add after "webSettings.setJavaScriptEnabled()" the following:
            webSettings.setDatabaseEnabled(true);
            webSettings.setDomStorageEnabled(true);
- This WebView will replace the LinearLayout in res > layout > main.xml.
    <WebView xmlns:android="http://schemas.android.com/apk/res/android"
        android:id="@+id/webview"
        android:layout_width="fill_parent"
        android:layout_height="fill_parent"
        android:scrollbars="none" />
- While we're at it, we should update the AndroidManifest.xml file. Just after the <use-sdk> parameter, add the following line:
<uses-permission android:name="android.permission.INTERNET"></uses-permission>
- Also we need to prevent Android from creating a new Activity when the user rotates his tablet. Add a parameter to the Activity declaration (for recent SDK versions, this should be android:configChanges="orientation,screenSize"):
    <activity
        android:name=".IceCreamActivity"
        android:label="@string/app_name"
        android:configChanges="orientation">
- You probably want to replace the default res > drawable > icon.png files (in three resolutions) with your own.
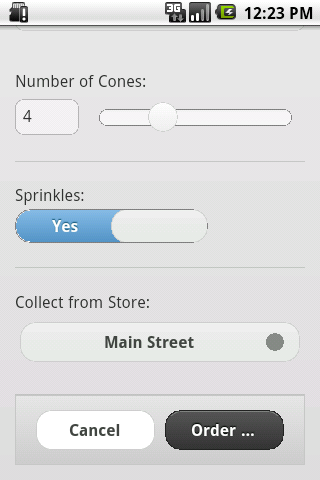
- Now we get to the core of this tutorial. Which is how to wrap the html, css and javascript of jQuery Mobile. Those files get all placed in the "assets" folder of the Eclipse project. And our Java Activity is attaching to that with the "webView.loadUrl()" call that we saw above. So, right click "assets", then "New > File" and give it the name "index.html". Right click the file and do "Open With > Text Editor" and now copy-paste our Ice Cream Order html code into it.
- Typically the jQuery Mobile javascript libs get loaded from the web. But I prefer to make it part of the package. Again right click "assets" and "New > Folder" and call it "js". Now, outside of Eclipse, copy your "jquery-1.5.2.min.js" and "jquery.mobile-1.0a4.1.min.js" into this "Workspace/IceCream/assets/js" folder. Similarly create a folder "assets/css" and copy "jquery.mobile-1.0a4.1.min.css" into it. (By now you're probably using newer jQM versions, that's ok.)
- At the top of your index.html file, include the following lines:
    <link rel="stylesheet" href="css/jquery.mobile-1.0a4.1.min.css" />
    <script src="js/jquery-1.5.2.min.js"></script>
    <script src="js/jquery.mobile-1.0a4.1.min.js"></script>
and if you have your own javascript and stylesheets, add those as well:
    <link rel="stylesheet" href="css/icecream.css" />
    <script type="text/javascript" src="js/icecream.js"></script>
Finally, within Eclipse, right click these files and do a "Refresh".
And now you're all set to run your new app. Probably first just in the emulator. Give it a shot and you should see something like this.

Although this is a working app now, with the java code doing nothing more than being a wrapper, I like to add some native Android functionality. And that is a menu to Reload the app and to Exit it. To do that we've to add two more methods: "onCreateOptionsMenu()" and "onOptionsItemSelected()". Check it out in the complete source code for the Activity.
That all being done, you've to package up the whole thing, sign it and upload it to the Android market. I use Eclipse for this:
- select your IceCream project
- then "File > Export"
- expand the "Android" option and select "Export Android Application", click "Next"
- and "Next" again
- enter the details of your key-store (I assume you have one), click "Next"
- select "Create new key", click "Next"
- give your key the alias name "icecream", enter and confirm a password, give it a validity of 25 years, enter your name and country code and click "Next"
- enter folder and filename "IceCream.apk"
- and finally you can click "Finish".
The resulting packaged and signed application can be uploaded to the Android market, or copied to your Android device using a USB key.
Posted at 01:58PM Nov 20, 2011 by WWWillem in Software |
CentOS 6 boot from USB
Installing CentOS 6 on a laptop without CD/DVD seemed to be easiest by using a Live-USB stick. However, on the net there were warnings that version 6 behaves different from CentOS 5. And indeed, it took me too a couple of attempts before I was successful. I downloaded the LiveCD ISO for CD, not DVD, because with 700 MB, it would fit on the 1 GB USB key I had lying around.
After a little research, I opted for this livecd-iso-to-disk script (or get it from GIT), which promises to do it all automagically. My first problem was that my CentOS 5 system didn't have 'udevadm', which I solved by changing in the script "udevadm info" into "udevinfo" and swapping "udevadm settle" for "udevsettle". After that, the USB key would build, until the stick had to be made bootable. Long story short, the isolinux / extlinux in CentOS 5 is too old. I could have downloaded a more current tarball and built it, but I was too scared that that would break something else.
My solution was to move the whole project to another system running a more current OS, in this case Fedora 15. After installing extlinux with a "yum install syslinux-extlinux", not only my udevadm issues were solved, but it also had a more recent isolinux, version 4. One tip: if you copy everything to the USB key and then at the end something breaks, like my extlinux, you can use the option "--skipcopy" to save quite a bit of time. Finally, I used an ext3 filesystem on my stick and it is a good idea to start each new attempt with a "mkfs.ext3 /dev/sd@#".
After booting from the USB stick, the next steps were of course an "Install to Hard Drive", then a "yum update", followed by using the GUI to install a whole slew of RPM packages.
Posted at 06:03PM Oct 15, 2011 by WWWillem in Software |
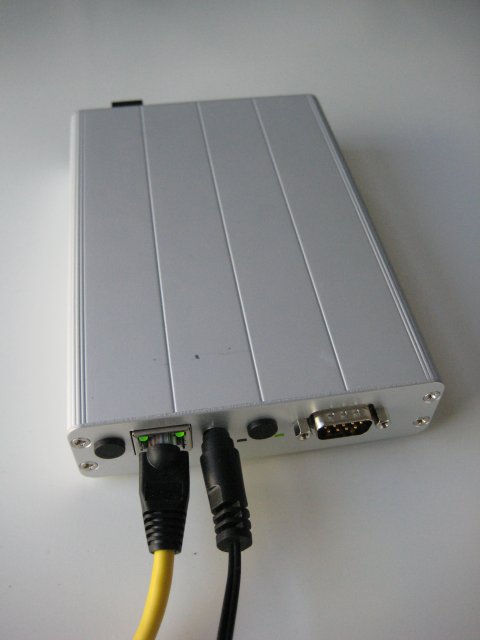
Slimp3 server with Voyage
With two SLIMP3 players in the bottom drawer (if I remember correctly, each around sixty bucks on eBay), it got time to make some better use of them. Now I've always had a SlimpServer / SqueezeBox running on the same box that's doing my MythTV, but I needed a setup independant from that. A small server, running Linux and Slimp, making no noise and preferably being cheap. That was the goal.
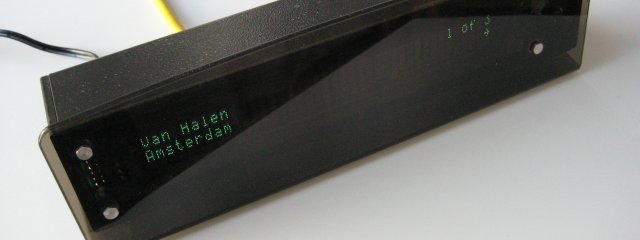
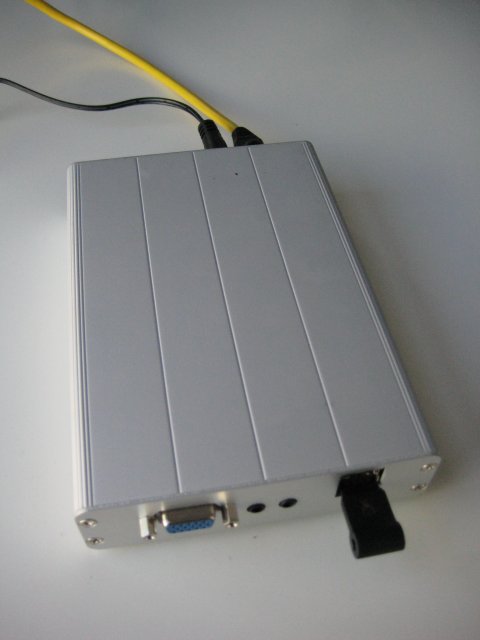
I started my research for Single Board Computers (SBC) again, checking out the latest status on Fit-PC and SheevaPlug. But then I found this little gem: the "alix3d3" from PC Engines. A Swiss company that makes SBC's in a form factor smaller than micro ITX. The board I got is 10x16 cm, powered by an AMD Geode processor and includes VGA, network port, 2x USB, RS232. And if you add a mini-PCI you can even do wireless.
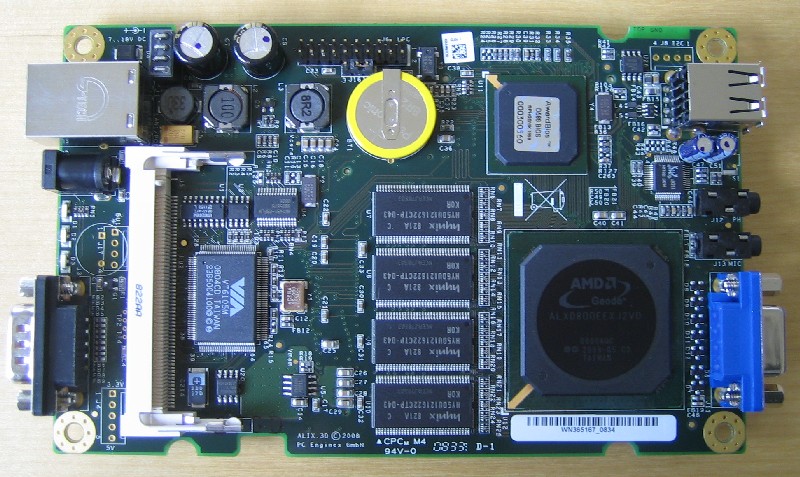

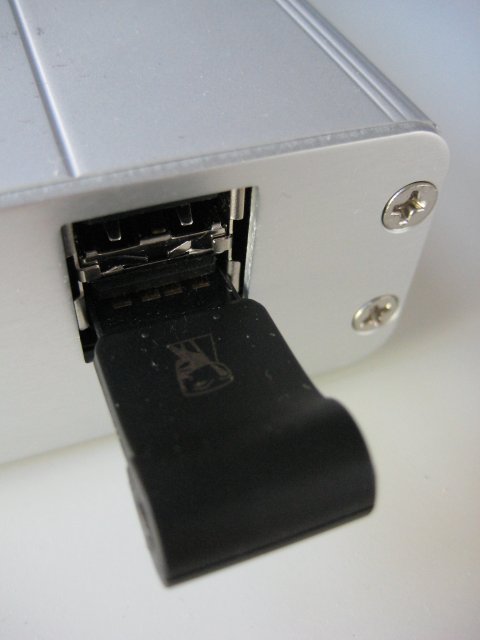
For my Slimp3 server, I added a 512 MB CompactFlash to boot from and a 16 GB USB stick for the music library. I could order all of that for less than 200 bucks including a pretty cool aluminum enclosure. The total size is smaller than an external 3.5" harddisk. Now the thing I'm still most amaized about is that little Kingston thumbnail on the right that is storing 300 CDs. I need quite a couple of bookshelves to store the physical CDs these MP3's came from.
Now the fun part was of course the software install. Did a bit of research and with this reduced hardware, a full blown Fedora or Ubuntu is not the way to go ..... but who needs X-Windows on a media server. The answer is a distro called Voyage. Based on Debian, but targetted at this type of SBC controllers. By itself it fits in roughly 100 MB, but when you include the squeezebox software and then the various dependant packages, it just fits in the 1/2 GB I had at hand.
Here follows my little HOWTO on installing it. The first step is to install Voyage on your CompactFlash, while it is still hooked up to your dekstop:
# fdisk -l /dev/sda
Disk /dev/sda: 512 MB, 512483328 bytes
16 heads, 63 sectors/track, 993 cylinders
Units = cylinders of 1008 * 512 = 516096 bytes
Device      Boot   Start   End   Blocks    Id   System
/dev/sda1   *      1       993   500440+   83   Linux
# mkfs.ext2 /dev/sda1
# tune2fs -c 0 /dev/sda1

# bunzip2 -k ./Voyage-0.7.5.tar.bz2
# tar xvf ./Voyage-0.7.5.tar
# cd ./Voyage-0.7.5
# more ./README
# more ./README.live-cd
#
# ./usr/local/sbin/voyage.update
#
What would you like to do? [Create new Voyage Linux disk]
What would you like to do? [Select Target Profile]
Please select Voyage profile: [ALIX]
What would you like to do? [Select Target Disk]
Which device accesses the target disk [/dev/sda]?
Which partition should I use on /dev/sda for the Voyage system [1]?
Where can I mount the target disk [/mnt/cf]?
What would you like to do? [Select Target Bootstrap Loader]
Which loader do you want (grub or lilo) [grub]?
Which partition is used for bootstrap [1]?
What would you like to do? [Configure Target Console]
Select terminal type: [Console]
What would you like to do? [Partition and Create Filesystem]
What shall I do with your Flash Media? [Use Flash Media as-is]
What would you like to do? [Copy Distribution to Target]
OK to continue (y/n)? y
What would you like to do? [Exit]
Next step is to move the CF card to your ALIX computer and boot that one. Then you've to install the SlimpServer / SqueezeBox packages. One of the problems is that the name of these packages has changed a couple of times, while Logitech took over Slimp. Based on this WiKi page, here is what finally worded for me:
# cat /etc/apt/sources.list
deb http://debian.slimdevices.com stable main
deb http://ftp.hk.debian.org/debian/ squeeze main contrib non-free
deb http://security.debian.org/ squeeze/updates main contrib non-free
# apt-get remove --purge slimserver
# apt-get remove --purge squeezecenter
# apt-get remove --purge squeezeboxserver
# apt-get update
# apt-get install squeezeboxserver
With that, your Slimp3 should work, but only when it is in "remountrw" mode. That's because SqueezeBox writes a cache to /var/lib, which is on Voyage a 'read-only' protected filesystem. To run your whole system, including the squeezebox software, in "remountro" mode, the trick is to modify your /etc/init.d/squeezeboxserver so that it copies the contents of /var/lib/squeezeboxserver to a new directory you create as /tmp/lib/squeezeboxserver. Next you've to change couple of environment variables in the squeezeboxserver setup to point to that directory instead of using /var/lib.
Enjoy the music!! The audio quality will be noticably better than what your typical computer can produce.
Posted at 12:08AM Oct 09, 2011 by WWWillem in Servers |
UCSand - You See Sand
UCSand is an Android application I recently developed to monitor a Cisco UCS blade system. The UCS Manager running on the Fabric Interconnects is based on an API using XML over HTTP. It is relatively easy to write shell or Perl scripts to collect data from the UCS system. Or to control it, like booting blades or turning the blue locator LED on or off.
A while back someone else developed a client GUI for the iPhone/iPad. With the Cius being released, a similar app for the Android platform is needed. Being a proud owner of an original "Google Developer Phone", it was time to get to work. Android code has to be developed in Java, so "talking XML over HTTP" isn't that difficult. It all comes down to old style socket programming.
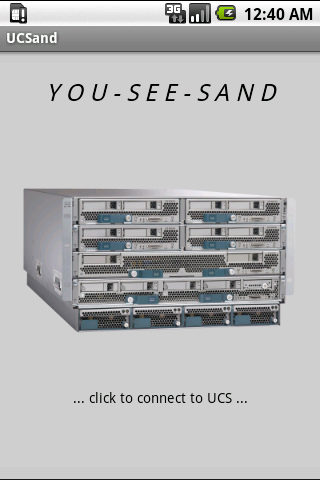
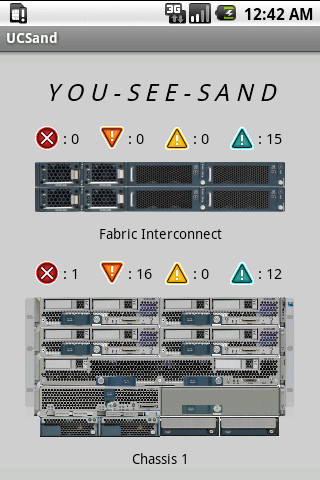
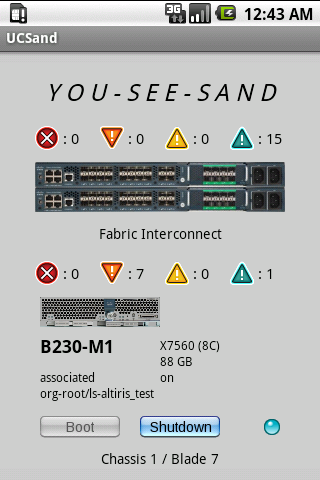
I opted for keeping the app relatively simple. It's mainly a monitoring tool that allows you to check on the status of your system when you're remote. It shows the configuration of your blades and you can go through the alarms and warnings for the various components in your system. On purpose I didn't include more complex actions like (dis)associating a service profile. Those things are better done from the fully featured UCS Manager.
Get the UCSand app by searching the Android Market / Google Play for "Cisco UCS". Update July 2012: The version you will find there is a little different from the one described here, because I migrated the app to a cross-platform development environment based on jQueryMobile. The original app was renamed to "UCSone" and can be downloaded by right-clicking here. The new UCSand is more suitable for tablets, while UCSone is great for older phones. However, I won't do any updates anymore on UCSone.
UCSand / UCSone will show more or less information about the blades depending on the size of the screen. On a phone, you've to click on a blade to see details, on a tablet you see some details and the status of the blade next to the image.
Finally, if you want to see the app in full action, check out the Mobility in the Datacenter blog of one of our customers at the City of Melrose.
Posted at 10:37AM Jul 24, 2011 by WWWillem in Servers |
PnmBlend Disappearing Act
Recently I was working on an automated tool to create images of 19" racks with their content. I got a nice picture of the new Cisco R42610 rack, but with the doors off, it still showed the hinges. No big deal, but it made the picture a little ugly.
I wanted to let those hinges disappear and had to be able to make it a repeatable thing. Therefore I didn't want to do it with PhotoShop, but preferred to script it using NetPbm. Now, NetPbm didn't have the right tool for the job, so it was time to write my own. Wasn't the first time, ten years ago I wrote together with Alex the pnmtopng/pngtopnm converters and more recently I contributed "pnmmercator", a cartography application.
The result of my current effort is "pnmblend", a little utility that will take the top and bottom row of an image (or the left and right column) and replace everything in between with a fading (or gradient) from one to the other.
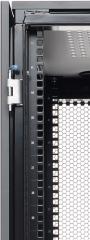
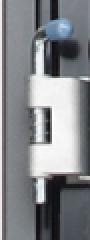
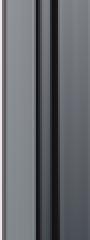

On the left you see the rack with the hinges still there. The next picture zooms in and the third shows the piece we've cut out to work on with "pnmblend". After that you see the output of my new utility and the last image is the result of putting it back in the original image using "pnmpaste".
This code isn't yet ready to be included in the official NetPbm package. For that I've to convert it from a 'pnm' to a 'pam' utility. Secondly, the current code isn't based on the NetPbm libraries, but is doing it all in itself. Which could in certain cases even be an advantage.
Update March 2011: This code was included in NetPbm under the name pamwipeout
Posted at 09:14PM Jan 29, 2011 by WWWillem in Software |
PQ PartitionMagic 983
On my Windows XP laptop, the C: drive partition had become too small. So, I freed up some space just after it to grow it to double its size. There are many ways to do that, but my favorite tool is PowerQuest's PartitionMagic. However it failed with an "Error 983 - Too many errors found, process halted.".
Googling that message proved that I wasn't the only one. The solutions ranged from doing a "Disk Cleanup" to running "chkdsk /f". An interesting suggestion was to remove old Restore Points on Microsoft's Support site. I tried all of those, but to no avail. And then there are the many "PC Health" or "Download 983 Repair Tool" ads at the top of the Google page. Everything else failing I opted for one of those, paid thirty bucks and let it do its magic. An hour later I tried Partition Magic again, but error 983 was still there.
While doing all that, I noticed an option in PQ Magic to convert the partition from NTFS to FAT32. That sounded intrusive enough :) that it could fix this 983 error. I went ahead and not surprisingly also that one failed, but now with an "Error 1681 - Data is compressed or sparse.". Researching this on the Symantec support site, suggested to "Turn off System Restore".

You find that option by right clicking "My Computer" (if your Desktop doesn't have a shortcut to My Computer, do this in Windows Explorer) and then click "Properties". Select the "System Restore" tab and enable "Turn off System Restore on all drives". Having done that, I went back to Partition Magic to try the resize operation again (yes, I put my convert to FAT32 on the back burner). Suddenly all went well and two minutes later I had doubled the size of my C: drive.
Posted at 08:43AM Nov 21, 2010 by WWWillem in Desktop |